Backstory: In my previous house, I had a mish-mash of home automation technologies running, all integrated through OpenHAB. I had Insteon, Lutron Caseta, Z-Wave, and another one or two I’m forgetting. It had evolved over time and had, as these things are wont to do, turned into giant pile of virtual spaghetti, as well as a mess to maintain.
We’ve been in our new house almost a year and a half now and I’ve been slowly automating things in a (slightly) more methodical way. Currently we’re primarily running Lutron Caseta dimmer switches and lamp modules, along with a number of smart plugs running Tasmota, and some Z-Wave locks. One of the biggest annoyances at the old house was maintaining the Insteon network, so that one has been on the back burner for a while.
There’s still a lot more stuff I want to automate (lots of light switches still to go, for example). While I love the Caseta stuff, it’s a bit pricey and I have a ton of Insteon switches sitting in a box in the garage, so I decided it’s finally time to start re-implementing my Insteon network.
That all starts with my Insteon 2413U PLM (PowerLinc Modem) that serves as the interface between my Linux container (on Proxmox) running OpenHAB and the Insteon RF & PowerLine networks. The biggest headache I had with the old house was that, whenever I needed to program in new devices and manage things like keypads, I had to physically disconnect the PLM from my VM server, connect it to my laptop running the now-discontinued HouseLinc software, do all the programming, and reconnect the PLM back to my VM server. That gets old real fast when you’re doing debugging and troubleshooting and don’t get things right on the first try. There has to be an easier way. There is an open-source utility called insteon-terminal, but it has somewhat limited functionality.
One of the things I’m about to do in my new house is move my HUSBZB-1 Z-Wave/Zigbee stick away from my little server rack in the corner of the house to somewhere more central where the radios have better reach. The stick just presents itself as a pair of USB Serial endpoints, so the plan for this is to connect the stick to a Raspberry Pi, run ser2net, and then use either socat or native RFC2217 in OpenHAB to connect to the stick for both the Z-Wave and Zigbee bindings.
The 2413U PLM looks to be just a FTDI USB-Serial chip glued to their 2413S serial PLM. So, I didn’t see any reason why I couldn’t do the same ser2net/socat-type setup from my Raspberry Pi acting as a serial bridge to a Windows VM somewhere running HouseLinc when I needed it there, and bridged to my OpenHAB VM during normal operations (switching back and forth would still need to be done, but at least I wouldn’t have to physically go to my rack and move cables). Alas, I futzed with it for a while but couldn’t quite make it work. The Windows COM port would successfully connect to ser2net on the Pi, but the HouseLinc software wouldn’t detect the PLM. Sadly, you can’t just specify the COM port in the HouseLinc config – you have to let it scan for the PLM and detect it, and that last bit just wasn’t happening for me. I was able to connect via socat on another Linux system running the insteon-terminal software , so I knew the serial bridge was working, but HouseLinc wasn’t happy with the setup.
So, I set about looking at USB-over-IP solutions. I found a few different options, including some with nice Windows GUIs for managing things, but they were mostly paid options and I wanted to try to do this all for zero cost if possible. Eventually I found the open-source USBIP Linux project and, most importantly, a fork of it that had working drivers for Windows 10. The documentation was a bit lacking for the Windows side of things, but I was able to get it up and running without too much trouble. So here’s how I did that.
Linux Server
First, I need to set up the server on the Raspberry Pi. It’s a Model 3 B+, it’s hostname is serial-bridge (since that’s all it’s going to do), and it’s running the latest Raspbian Buster. I found a great blog post at https://derushadigital.com/other%20projects/2019/02/19/RPi-USBIP-ZWave.html that goes into more detail on the process, so I’ll just summarize the steps I went though here.
Prerequisites:
- Raspberry Pi (I’m using a Model 3 B+)
- Up to date Raspbian (as of this writing, that’s Raspbian Buster)
- Insteon 2413U USB PLM
- Static IP and hostname for your Pi
Setup
SSH to serial-bridge and switch to root.
ssh serial-bridge

sudo -s
Now, plug in the 2413U USB PLM and check the USB devices with lsusb:
serial-bridge# lsusb
Bus 001 Device 010: ID 0403:6001 Future Technology Devices International, Ltd FT232 Serial (UART) IC
Bus 001 Device 005: ID 03f0:164a HP, Inc
Bus 001 Device 004: ID 03f0:094a HP, Inc Optical Mouse [672662-001]
Bus 001 Device 006: ID 0424:7800 Standard Microsystems Corp.
Bus 001 Device 003: ID 0424:2514 Standard Microsystems Corp. USB 2.0 Hub
Bus 001 Device 002: ID 0424:2514 Standard Microsystems Corp. USB 2.0 Hub
Bus 001 Device 001: ID 1d6b:0002 Linux Foundation 2.0 root hub
That FTDI FT232 device there with ID 0403:6001 is the 2413U PLM (yes, Insteon uses an FT232 chip with the default FTDI vendor and device IDs, instead of getting their own IDs. *sigh*).
While we’re here, check dmesg for the device’s serial number – that will be needed later.
[ 1456.607470] usb 1-1.3: new full-speed USB device number 9 using dwc_otg
[ 1456.765023] usb 1-1.3: New USB device found, idVendor=0403, idProduct=6001, bcdDevice= 6.00
[ 1456.765042] usb 1-1.3: New USB device strings: Mfr=1, Product=2, SerialNumber=3
[ 1456.765055] usb 1-1.3: Product: FT232R USB UART
[ 1456.765068] usb 1-1.3: Manufacturer: FTDI
[ 1456.765080] usb 1-1.3: SerialNumber: A501LCRA
[ 1456.773960] ftdi_sio 1-1.3:1.0: FTDI USB Serial Device converter detected
[ 1456.774166] usb 1-1.3: Detected FT232RL
[ 1456.775801] usb 1-1.3: FTDI USB Serial Device converter now attached to ttyUSB0
In my case, the serial number is A501LCRA.
Now we need to install the usbip software:
apt install usbip
Load its kernel module:
modprobe usbip_host
Add the kernel module to the list of modules loaded on boot:
echo "usbip_host" >> /etc/modules
Now create a service definition so it’ll start on boot. Using nano (or your editor of choice):
nano -w /lib/systemd/system/usbipd.service
I used the following block (which differs slightly from the one in the example I linked above):
[Unit]
Description=USB-IP Binding
After=network-online.target
Wants=network-online.target

[Service]
Type=simple
ExecStart=/usr/sbin/usbipd
ExecStartPost=/bin/sh -c "/usr/sbin/usbip bind --$(/usr/sbin/usbip list -p -l | grep '#usbid=0403:6001#' | cut '-d#' -f1)"
ExecStop=/bin/sh -c "/usr/sbin/usbip unbind --$(/usr/sbin/usbip list -p -l | grep '#usbid=0403:6001#' | cut '-d#' -f1); killall usbipd"
[Install]
WantedBy=multi-user.target
Save the file (CTRL-o, CTRL-x in nano), and then run the following commands in your shell:
# reload systemd, enable, then start the service
sudo systemctl --system daemon-reload
sudo systemctl enable usbipd.service
sudo systemctl start usbipd.service
Windows Client
Next comes the Windows client. I’m running Windows 10 x64 Professional in a VM, but it should be applicable to most other Windows systems.
Download the USB/IP certificate from https://github.com/cezanne/usbip-win/blob/master/driver/usbip_test.pfx
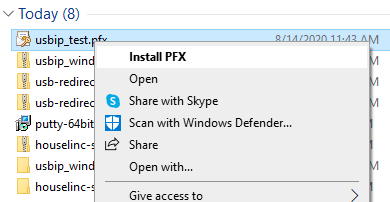
Install the certificate. It needs to go into a couple different places, so you’ll go through this twice. Right-click on the .pfx file and choose “Install PFX” (or just double-click on it, whatever floats your boat).
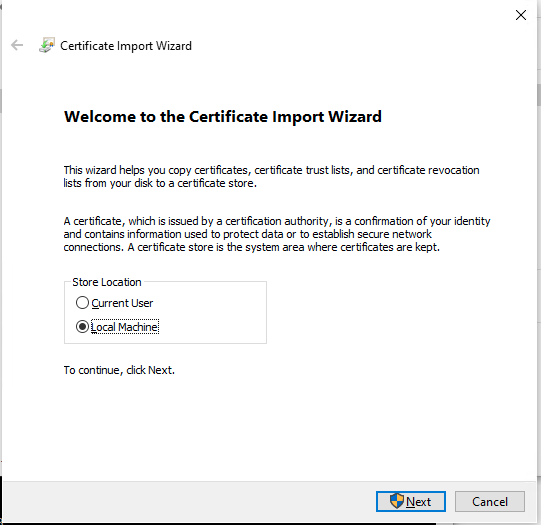
Run through the installation wizard with the following choices:
Choose “Local Machine” for the Store Location:
Acknowledge the UAC prompt.
Confirm the file path and click “Next”
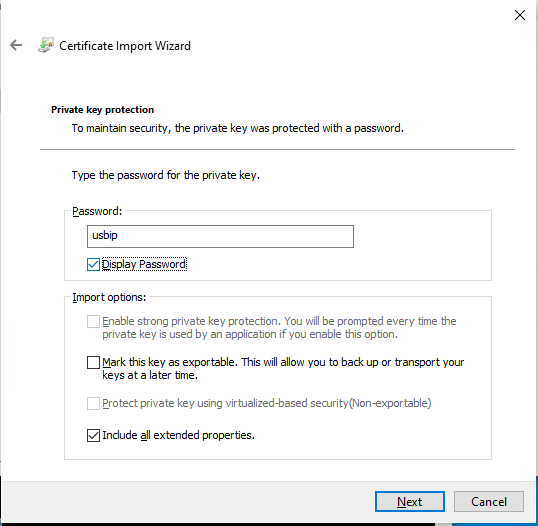
Enter the password for the certificate (it’s usbip).
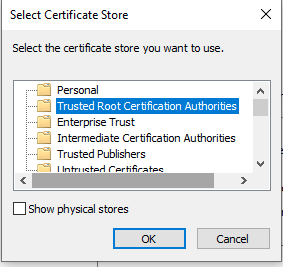
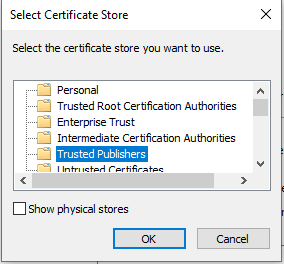
Then choose “Place all certificates in the following store” and click “Browse…”
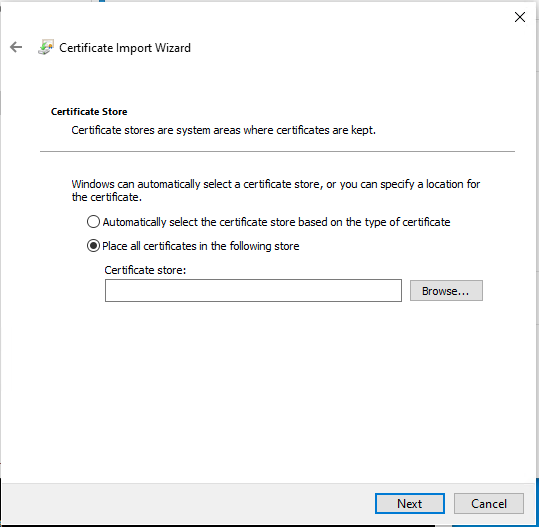
You’ll need to go through the wizard twice, choosing “Trusted Publishers” one time and choosing “Trust Root Certification Authorities” the other.
Next, you need to enable test signing of driver certificates. Open a CMD or PS window as Administrator and enter:
bcdedit.exe /set TESTSIGNING ON
Then, reboot the system for this change to take effect. I use this VM solely for Windows-based Home Automation utilities, so I’m ok with this change here. YMMV.
Next, download the following files from the GitHub release page (as of this writing, 0.3.0 is the latest version): https://github.com/cezanne/usbip-win/releases/tag/v0.3.0
- usbip.exe
- usbip_vhci_ude.cat
- usbip_vhci_ude.inf
- usbip_vhci_ude.pdb
- usbip_vhci_ude.sys
I moved them all into a new folder named "C:\Program Files (x86)\usbip\".
Install the USB/IP UDE driver. Open a PS or CMD shell as Administrator and run:
cd "C:\Program Files (x86)\usbip\"

usbip.exe install_ude
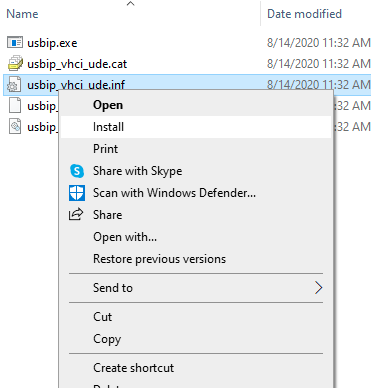
It may or may not also be necessary to install the downloaded .inf file. I did both, but the docs are somewhat fuzzy. If you find things don’t work, then do this. Right-click on the .inf file and choose “Install” and go through the wizard.
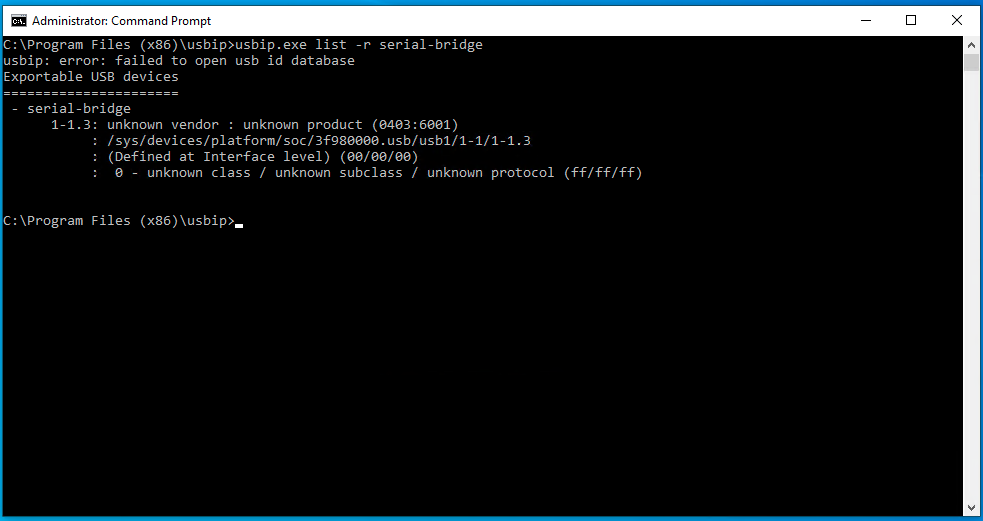
Finally, you can try listing the devices on the Pi bridge and attaching the remote USB device. Back in your Adminstrator-level window, to list the remote devices, run:
usbip.exe list -r serial-bridge
You should see something like this:
To attach the USB device shown above, run:
usbip.exe attach_ude -r serial-bridge -b 1-1.3
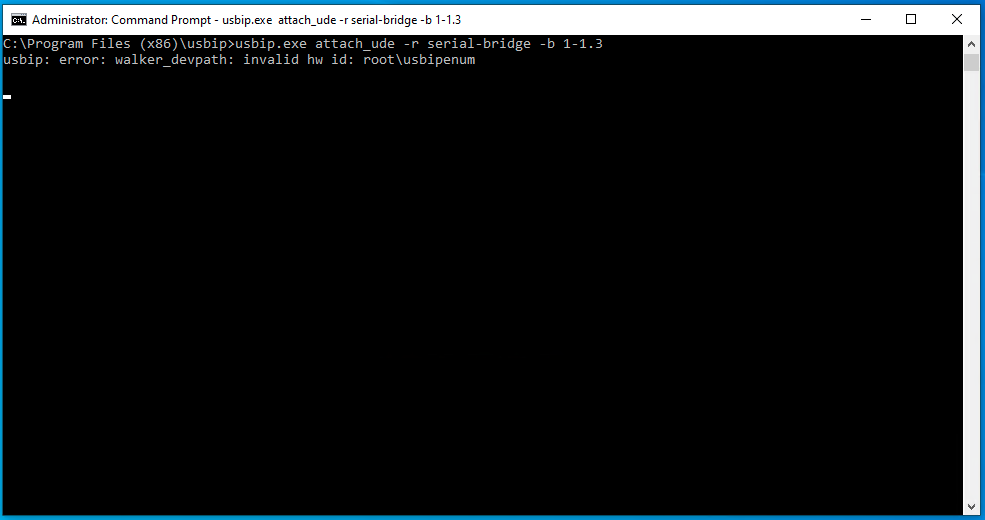
Note: I sometimes got that “invalid hw id: root\usbipenum” but it didn’t seem to have any effect on anything.
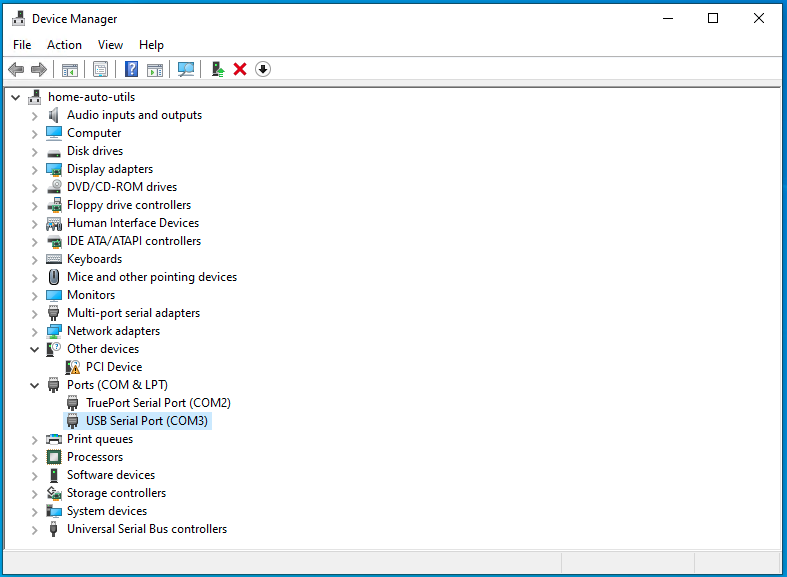
If you open up Device Manager, you should now see a new COM port present on your system (COM3 in my case):
Fire up HouseLinc
If needed, you can still download HouseLinc 2.10.25 from (as of this writing, anyway): https://www.insteon.com/support-knowledgebase/2016/6/1/houselinc-windows
Launch HouseLinc. If this is your first time launching it, you should see a screen like this: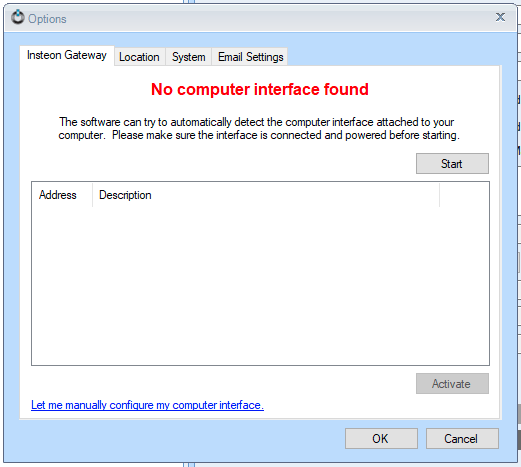
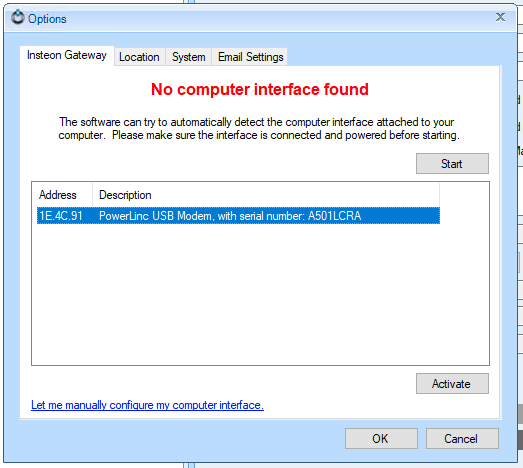
HouseLinc should automatically start scanning for interfaces, and it should find and detect your bridged PLM. Click on it to select it, and click “Activate”.
And that should do it!
Now, if I need to run HouseLinc, I can stop the bridge client on my OpenHAB VM, fire up the HA Utils VM, run the usbip.exe command, and open up HouseLinc. If I get tired of doing that, I’ll write a batch script or two to run usbip and open HouseLinc automatically.
Just remember to kill the usbip.exe process (a Ctrl-C in the CMD window should be sufficient) before resuming things in OpenHAB.
Linux (OpenHAB) Client
Of course, in addition to being able to use HouseLinc to maintain the Insteon network, I need OpenHAB to be able to use it 99.9% of the time. I run OpenHAB in a LXC container on Proxmox, so the easiest way (but probably not the only way) to do this is to attach the remote USB device in Proxmox itself (where it will be seen as a regular USB device), and then pass that device through to the container.
Connect to the Proxmox server (running a single node of version 6.2-4 in my case):
ssh root@proxmox-01
First, set up a udev rule to map the device to a known symlink in /dev/. This makes passthrough easier. Adjust your serial number as needed (hopefully you wrote that down above):
echo "SUBSYSTEM==\"tty\", ATTRS{idVendor}==\"0403\", ATTRS{idProduct}==\"6001\", ATTRS{serial}==\"A501LCRA\", SYMLINK+=\"insteon\"" > /etc/udev/rules.d/99-insteon-plm.rules
Install the usbip package:
apt install usbip
Load the vhci-hcd module and add it to the list of modules loaded at boot:
modprobe vhci-hcd
echo 'vhci-hcd' >> /etc/modules
Much like the bridge server, we now need a service to manage the bridged device. With nano or your preferred editor, create the service file:
nano -w /lib/systemd/system/insteon-bridge.service
Copy and paste the following service definition (changing hostnames and device IDs as necessary):
[Unit]
Description=USB-IP Client for Insteon Bridge
After=network-online.target
Wants=network-online.target

[Service]
Type=oneshot
RemainAfterExit=yes
ExecStart=/bin/sh -c "/usr/sbin/usbip attach -r serial-bridge.davecorder.org -b $(/usr/sbin/usbip list -r serial-bridge.davecorder.org | grep '0403:6001' | cut -d: -f1)"
ExecStop=/bin/sh -c "/usr/sbin/usbip detach --port=$(/usr/sbin/usbip port | grep -B1 '(0403:6001)' | grep '<Port in Use>' | sed -E 's/^Port ([0-9][0-9]).*/\1/')"
[Install]
WantedBy=multi-user.target
(Note that this service file probably won’t work if you have multiple USB-IP devices attached. The ExecStop line will probably need to be adjusted. To be tested…)
Save the file, then run the following commands to enable it:
# reload systemd, enable, then start the service
sudo systemctl --system daemon-reload
sudo systemctl enable insteon-bridge.service
sudo systemctl start insteon-bridge.service
Check your output from dmesg:
[7886814.571203] vhci_hcd vhci_hcd.0: pdev(0) rhport(0) sockfd(3)
[7886814.571207] vhci_hcd vhci_hcd.0: devid(65546) speed(2) speed_str(full-speed)
[7886814.747402] vhci_hcd: vhci_device speed not set
[7886814.807399] usb 3-1: new full-speed USB device number 4 using vhci_hcd
[7886814.879397] vhci_hcd: vhci_device speed not set
[7886814.939406] usb 3-1: SetAddress Request (4) to port 0
[7886815.025667] usb 3-1: New USB device found, idVendor=0403, idProduct=6001, bcdDevice= 6.00
[7886815.025670] usb 3-1: New USB device strings: Mfr=1, Product=2, SerialNumber=3
[7886815.025672] usb 3-1: Product: FT232R USB UART
[7886815.025673] usb 3-1: Manufacturer: FTDI
[7886815.025674] usb 3-1: SerialNumber: A501LCRA
[7886815.043764] ftdi_sio 3-1:1.0: FTDI USB Serial Device converter detected
[7886815.043808] usb 3-1: Detected FT232RL
[7886815.055797] usb 3-1: FTDI USB Serial Device converter now attached to ttyUSB2
Check your lsusb:
root@proxmox-01:~# lsusb
Bus 004 Device 001: ID 1d6b:0003 Linux Foundation 3.0 root hub
Bus 003 Device 004: ID 0403:6001 Future Technology Devices International, Ltd FT232 Serial (UART) IC
Bus 003 Device 001: ID 1d6b:0002 Linux Foundation 2.0 root hub
Bus 002 Device 013: ID 10c4:8a2a Cygnal Integrated Products, Inc.
Bus 002 Device 007: ID 1058:25fb Western Digital Technologies, Inc.
Bus 002 Device 006: ID 1058:25fb Western Digital Technologies, Inc.
Bus 002 Device 003: ID 05e3:0610 Genesys Logic, Inc. 4-port hub
Bus 002 Device 002: ID 8087:0024 Intel Corp. Integrated Rate Matching Hub
Bus 002 Device 001: ID 1d6b:0002 Linux Foundation 2.0 root hub
Bus 001 Device 005: ID 0624:0249 Avocent Corp. Virtual Keyboard/Mouse
Bus 001 Device 004: ID 413c:a001 Dell Computer Corp. Hub
Bus 001 Device 003: ID 0d3d:0040 Tangtop Technology Co., Ltd PS/2 Adapter
Bus 001 Device 002: ID 8087:0024 Intel Corp. Integrated Rate Matching Hub
Bus 001 Device 001: ID 1d6b:0002 Linux Foundation 2.0 root hub
Check your symlink:
root@proxmox-01:~# ls -la /dev/insteon
lrwxrwxrwx 1 root root 7 Aug 14 14:16 /dev/insteon -> ttyUSB2
Now, for Proxmox, grab the container ID for the OpenHAB container and run this:
echo "lxc.mount.entry: /dev/insteon dev/insteon none bind,optional,create=file" >> /etc/pve/lxc/<containerid>.conf
Now restart the container and you should be good to go!
Installed on CentOS8 my old hp 920c, because poor quality of drivers in cups.
Needed some additional work – centos kernel has no compiled usbip module.
So needed to install kernel from alternate repository as well as get usbip from there (Elrepo).
Everything else was quite similar to your steps.
Thanks.